Ed note: this is part 2 of a series. You can find part 1 here
Publishing systems like Squarespace, Wix, and WordPress are platforms that the general public can use to build websites with minimal or no coding experience needed. With popular drag-and-drop builder frameworks available for WordPress, as well as the plugins that these platforms offer, building websites has become a relatively easy thing to do. Whether you want to drag-and-drop blocks of text, an image, or a slideshow onto a web page, most common components needed to build a website have been pre-built by these vendors and are ready to use.
While many plugins and drag-and-drop builder components offer users the freedom and flexibility to style their components and set them up in various configurations, the challenge is that some of those styles and configurations might not be accessible. A good example of this is contact forms. Whether the contact form is a plugin from the Wix or WordPress repositories, or if they are part of a drag-and-drop framework like Beaver Builder or Elementor, there is not much guidance by these vendors on contact form accessibility other than what might be included in their documentation. But users of these platforms are probably not aware of web accessibility, nor is it likely that they’re reading the documentation. They probably assume that the vendors are going to take care of all functional aspects of their components for them, which includes accessibility.
Popular Contact Form Plugins
There are many contact form plugin options available – both free and paid-for. For WordPress, specifically, some of the most popular contact form plugins are Formidable Forms, Ninja Forms, Gravity Forms, WP Forms, and Contact Form 7. Some of these vendors have gone a long way in making their forms more accessible. Formidable Forms and Gravity Forms have listed how they have done so. Wix, on the other hand, documents how to create accessible contact forms with their platform, as well as Contact Form 7. Still, even with the improvements made in accessibility, the remainder of the work is left to the users of these platforms.
In this article, I am going to demonstrate accessible contact form configuration using Contact Form 7. The reason I chose it is because it is the one I am most familiar with using, and because – as of this writing – it is WordPress’s most downloaded contact form from its plugin directory. However, some of these principles apply to any contact form plugin or widget you are using. If you are a Contact Form 7 user, I would highly recommend Joe Dolson’s Contact Form 7’s Accessible Defaults plugin. This plugin offers four accessible templates to start your form with and is also what I’m using as a starting point for this demo.
Always Use Labels for Form Fields
A popular web design trend is to design forms without visual labels above or next to a field, instead using placeholder text to describe what each field means. As tempting as it can be to use this approach, it is not good practice. Relying on placeholder text as a label, which then disappears, is technically a failure of WCAG 3.3.2 Labels or Instructions. One reason is that users with cognitive disabilities may have trouble remembering or understanding what text they were supposed to enter into a form field once the placeholder text is no longer displayed. Placeholder text can be potentially confusing because it can also be mistaken for text that is already filled in, especially if the placeholder text still displays when a user places their cursor in the field. Another reason is that the plugin vendor, or the creators of whatever publishing platform you are using, might not have included ARIA labels in their markup to shore up the lack of visual labels (which would help screen reader users determine what each form field means). If you are not sure about the plugin or platform’s accessibility practices, it is a safe bet to use visually apparent labels for each field in your contact form instead.
The contact form that I have set up with Contact Form 7 not only has proper labels, but it also includes the <label> for attribute. This helps make the text field more descriptive for a screen reader user. So, for example, if a screen reader user is using their tab key and tabbing to each field, the screen reader will read back the same description as your field label.

Figure 1 A contact form that includes labels.
Since the Contact Form 7 Accessibility Defaults plugin is a tool that gives the user an accessible form template to work off of, it does not give the same accessible markup to any new fields the user creates. And if the user is not familiar with HTML, it might be challenging to understand how exactly to set up other fields to make them accessible in the same way. Here is how to set up a new field to ensure that it has the same level of accessibility as the others:
- Click on the Text button
- Give your text field a name and an ID (I recommend giving them the same name)
- Add the same <p> tags and the <label> tags to your text element as the ones that come with the template
- In the opening <label> tag, add the for attribute and use the associated field’s ID as the value (in this case, <label for=“street-name”>, where “street-name” is the ID of the field visually labeled as “Street Address”).
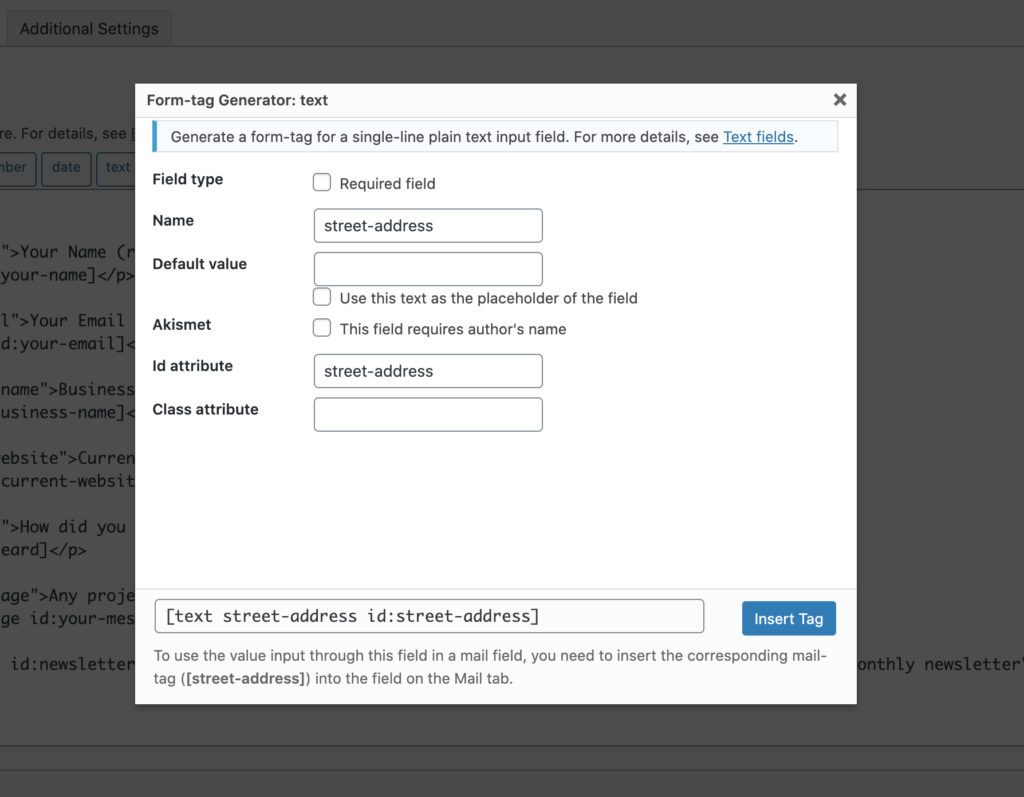
The <label>’s for attribute that references your field’s ID is what indicates to a screen reader that it should announce the visible label of the text field.
<p><label for="street-address">Street Address</label>
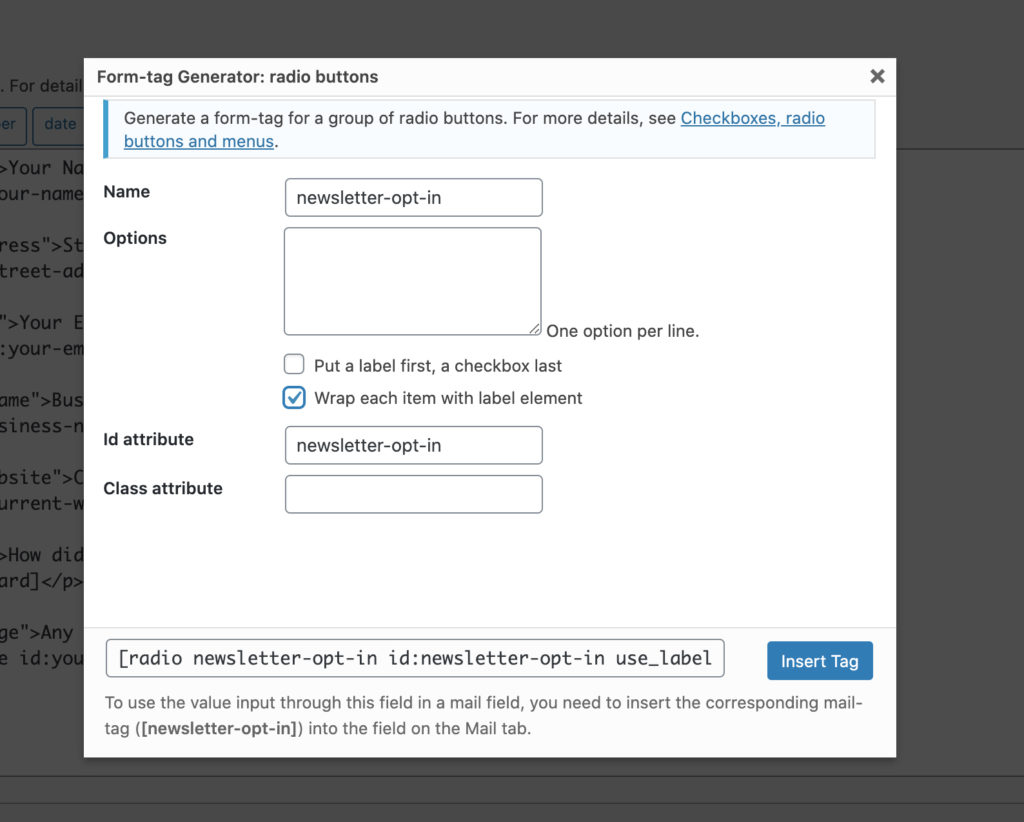
[text street-address id:street-address]</p>But what if the user needs an opt-in for a newsletter subscription and the accessible template they started with did not include radio buttons? There is a template configuration in Contact Form 7 Accessible Defaults that includes radio buttons, but that would mean starting all over again. Fortunately, Contact Form 7 does come with a radio button configuration option that is more accessible than the other.
How to set up radio buttons for accessibility
- Click on “Radio Buttons” in the CF7 form options
- Give the radio buttons a name and an ID
- Check the “Wrap each element with label element” checkbox
- Click “Insert Tag”
Know Each Platform and Plugin’s Limitations
Though you might not always have control over the output when it comes to accessibility in publishing platforms or third-party plugins, being able to incorporate discrete accessibility enhancements where you can will go a long way. As a user of publishing platforms, the best thing to do is be mindful of each platform’s accessibility practices and their limitations. Look at their documentation to see if they offer guidance on how to create more accessible websites using their tools. You can also see if they mention the ways in which they have made their platforms more accessible.